Life in a Redis Cluster: Meet and Gossip with your neighbors
Redis Cluster is going to change your view of Redis.
Since release 3.0.0, Redis is able to operate in Cluster mode, providing automatic data sharding across multiple nodes with a high degree of fault tolerance.
Well known techniques have been around for quite some time now to partition the data set and scale Redis to many instances, the most simple and effective one being client side partitioning implemented with consistent hashing. Redis Cluster goes a step forward in the direction of high scalability: it has been designed from the beginning with focus on high performance and with the aim to provide a set of consistency and availability guarantees that are suitable for different kinds of applications.
There is an increasing amount of documentation around Redis Cluster, including official resources like the quick-start tutorial for end users and detailed tech specifications for developers. In this post we’ll focus on the cluster networking internals, to give you an overview of the role and the importance of inter-node communications.
Redis Cluster topology
A set of isolated Redis instances, with proper configuration and guidance, can be joined to form a Redis Cluster. The minimal working cluster is composed of three master nodes, but Redis Cluster is designed and tested to scale efficiently up to 1000 nodes. In our examples, for the sake of simplicity, we’ll consider only sets of masters without attached slaves.
Nodes in a Redis Cluster talk to each other using the Cluster Bus. Every node is connected to every other node through a dedicated tcp connection, thus forming a fully connected network. This node-to-node communication channel is used exclusively for cluster operations (e.g. configuration update, failure detection, failover authorization) and its links are kept separate from normal client connections.
Nodes exchange data over the bus using a binary protocol, which is deliberately undocumented because it is not intended to be used by clients. Of course, code speaks and Redis source code is always worth studying.
Cluster heartbeat: PING / PONG packets
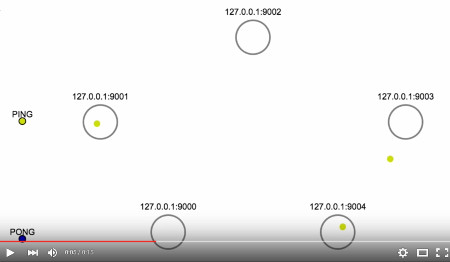
Under normal conditions, nodes of the cluster continuously exchange PING and PONG packets over the bus (remember we’re talking about raw binary packets here, not to be confused with the PING client command).
This packet flow constitutes the heartbeat mechanism of the cluster, a means of information propagation fundamental to some key features such as, for example, node auto-discovery and failure detection. In fact, each ping/pong packet carries important pieces of information about the state of the cluster from the point of view of the sender node, like hash slots distribution, configuration information and additional data about other trusted nodes.
This animation1 shows the heartbeat packet flow in a cluster of 5 master nodes under normal operation. While it is extremely slowed down, you can see that every PING packet triggers a PONG reply from the receiver node:
In order to avoid exchanging too many packets on the network, usually a node
will ping only a few (not all) randomly chosen nodes every second. However, the
cluster-node-timeout configuration parameter controls (among other things) the
volume of heartbeat packets exchanged between nodes: each node in the cluster
will always try to ping every other node that didn’t send a PING or received a
PONG for longer than half this timeout value.
In other words, information about other nodes is refreshed after -at most- half
cluster-node-timeout milliseconds, so this value significantly affects the
hearthbeat traffic. Although packets are usually small in size, a lower timeout
will cause a sensibly higher network traffic in a very large cluster. This
setting is also involved in failure detection: if a node seems to be
unreachable, before complete timeout expiration the sender will try to renew the
underlying tcp connection and ping it again.
Cluster bootstrap: MEET packets
Fundamental to the bootstrap process of a Redis Cluster and, in general, to the addition of new nodes, is the MEET packet. Its binary structure is similar to the PING / PONG packets, but a node receiving a MEET message will accept the sender as a new trusted node of the cluster.
In fact, being part of a Redis Cluster is a matter of being trusted by your neighbors. While any node in a cluster will blindly reply to incoming PINGs on the cluster bus port, it won’t process any other sensible packet nor will consider another Redis instance as part of the cluster until such untrusted source introduces itself with a MEET packet.
To stimulate a new node to join an existing Redis Cluster we need to use the CLUSTER MEET command. The syntax
CLUSTER MEET ip port
will force Redis, when configured in cluster mode, to send a MEET packet to the
specified node. Note that port here is the bus port, and any node of the
cluster can be used as target, as we’re going to explain.
The creation of a Redis Cluster is usually handled with the redis-trib tool, a
Ruby utility that simplifies cluster operations for sysadms. What this script
actually does in order to bootstrap a cluster of N nodes, is a kind of brute
force approach:
- the first Redis instance passed on the command line is selected as a trusted node,
- then a CLUSTER MEET command is sent to every other node to meet with this first one.
This means that initially the trust relationship between cluster nodes is effectively forced by the sysadm.
In this animation you can see the bootstrap phase of a Redis Cluster with 5 masters:
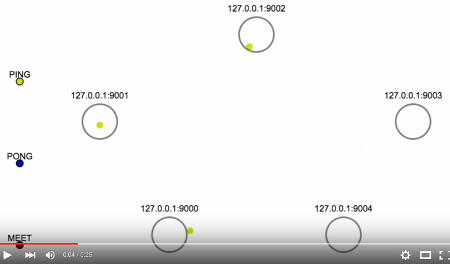
Here node 9000 is the first trusted node, so every other node meets with it and receives a PONG reply. After some time that node 9000 knows about every other node in the cluster, you can see other nodes spontaneously getting in touch with each other through additional MEET messages, thus forming the fully connected network of an operational Redis Cluster. How did this information propagate across all nodes?
Gossip: rumors worth listening to
Redis Cluster uses a simple Gossip protocol in order to quickly spread information through any connected node. Heartbeat packets carry information on their own, but they also contain a special header for gossip data.
This section contains information about a few random nodes among the set of nodes known to the sender. The number of entries included in the gossip header is proportional to the size of the cluster (usually 1/10 of the nodes, but may be empty as well in some cases). The trick is: almost any heartbeat packet contains data about some (a few) nodes of the cluster from the point of view of the sender. This is how information propagates quickly at large scale without requiring an exponential number of messages exchanged.
Through gossip, all nodes eventually converge to a common shared view of the
state of the cluster. This continuous information exchange is crucial in various
point in life of the cluster like, for example, at bootstrap time and during
node or network failures. In particular, when connecting a new node to an
existing cluster, the redis-trib script just issues a single CLUSTER MEET
command, then gossip makes the magic of auto-discover.
This last animation shows in details what happens when a new node is connected to a cluster of 50 nodes:
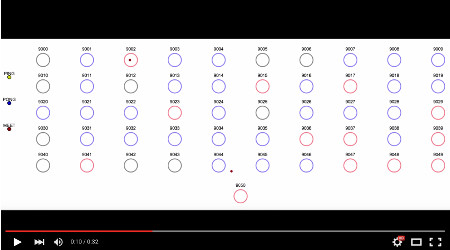
The video only shows MEET messages and PING / PONG packets that carry the information of the new node (so a lot of other heartbeat traffic is not represented). Nodes are initially in gray as they don’t know about the newly connected Redis instance, nor it knows about them. What can happen here is either:
- the new node gets to know about a cluster node first (which is then highlighted in blue), or
- a cluster node is informed about the new node first (in this case is highlighted in red).
This second event happens either by directly receiving a MEET or through a gossip info from a peer. In the example above, node 9050 meets with 9049 and receives gossip info by the PONG reply, then the information quickly flows and the nodes eventually form a fully connected graph again.
It is worth noting that is much easier for the new node to discover existing
nodes (i.e. case 1 is the majority), because every MEET/PONG exchange carries
data about potentially unknown nodes. If you’re wondering how fast it is, the 50
nodes above were configured with a cluster-node-timeout of 500 ms and the
auto-discovery phase converged in about 400 ms.
-
Animations in this post were created from real data using this packet-flight tool hacked by Carlos Bueno. You may want to have a look at his famous HTTP request visualization. ↩